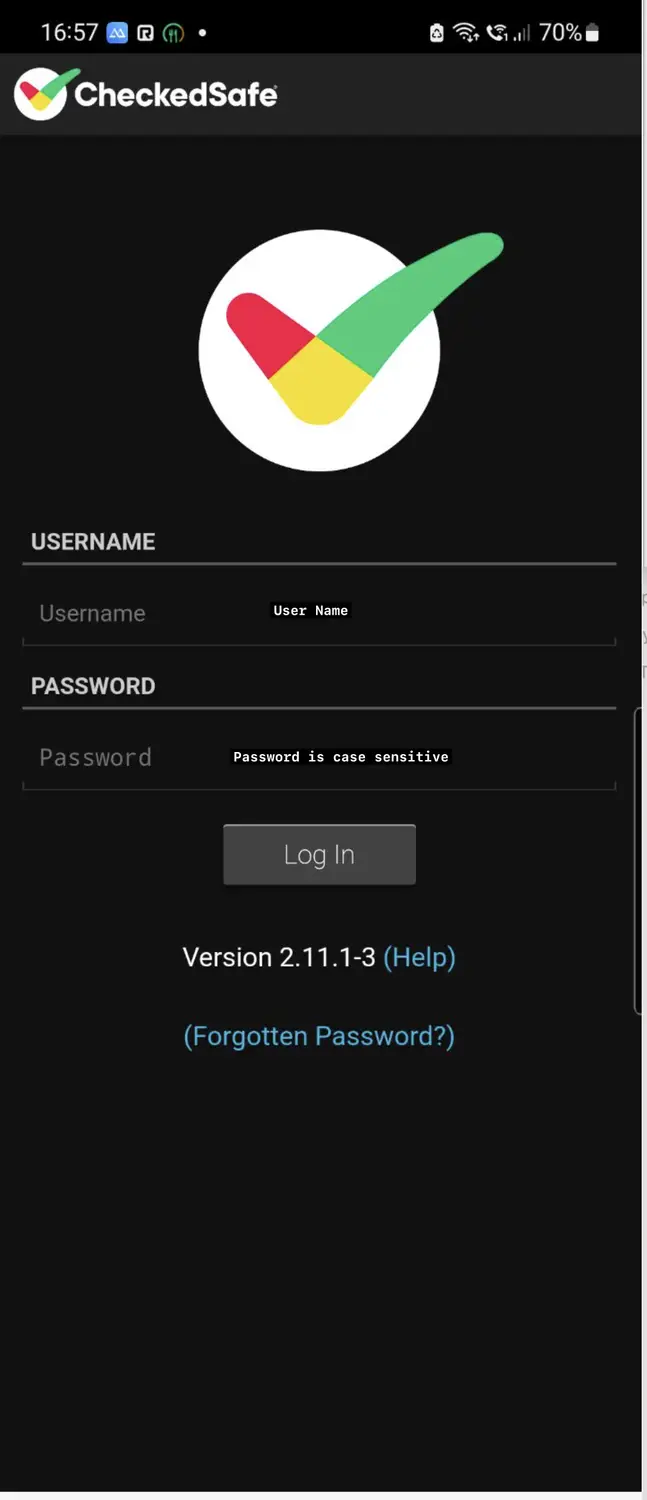
Picture of lorry wheels

Vehicle Compliance – App User Guide

Last Updated: July 27, 2023 at 2:44 pm

Login Screen

  1. Login screen when you open the App. Each person will be allocated a unique log in and password
  2. Enter user name (not case sensitive)
  3. Password is case sensitive
  4. Press LoginYou can have 2 factor on request support@checkedsafe.com

Help Menu

By Pressing Help you can access the help menu section 

Upload Log information – Checkedsafe may require your log info if you are having issues – if so press upload log information

Reset CheckedSafe – this resets the App

Test Connectivity – if your having signal issues this will inform you of any signal issues

Email Geo Log – this sends Checkedsafe a log of your location

Switch to light Mode – allows you to have black on white as a user mode (shown here is White on Black mode)


User Menu

User Menu, here you can pick any option to take you to the next stage

Start Check – Start the process

Sync – if you have had poor signal your check/photos maybe stored on the device press sync to upload to the server

Previous Checks – NOTE the list is only the cached checks you need to enter the vehicle reg at the top to pull in the PDF report of the checks

Info – information to user how App works – brief description for the App user to follow

Documents – If your company has pushed documents out to you you can access them here it also informs you if any are waiting to be opened (red number)

Messages – If your company has pushed messages out to you you can access them here it also informs you if any are waiting to be opened (red number)

Job Cards – if you have this feature you can access the job cards waiting for you as Assigned (red numbers) or pick of any open jobs on the Available list

If you company has opted for Geo Tracking it will show as a Green Dot indicating that it is active

If your ready to start PRESS START CHECK

Enter Registration/Asset ID

Enter asset ID

As you start to enter the details the vehicle details will start to populate;

If you see Vehicle Ended – the vehicle has been ended you need to seek advice – you will not be able to go any further

If you see VOR – Do not Use – the vehicle is not in use you need to seek advice – you will not be able to go any further

Top Tip

See the light bulb top right, touch it and it’s a light! no more checks in the dark.

The Manual Button (which is optional and managed on the user profile) is to undertake checks that do not have an asset ID

Please Note:

the buttons on this page of the app may have different labels if requested by the client but the working principles remain the same

Logged In

Once logged in your template will be available to start your check. Typically you will see (not exhaustive)

Initial Daily First Use check – detailed first use check template

In Service defect – quick in service defect report – handy for breakdown reporting

Accident report – this is an electronic bump card with pinging back a bump report in seconds

Any other templates that the client has requested to be added i.e. Fuel Record

TIP: Top left shows the Asset ID that your checking in this case “CSVAN”

Top right Lightbulb hijacks the camera flash to use as a torch whilst checking the asset if required

Red Warning Triangle

NOTE: If when you have picked your template this screen appears next if it’s a RED warning triangle there is an outstanding defect and you must seek further assistance prior to moving on as it maybe a serious defect – STOP AND SEEK HELP

Amber Triangle

If there is a Yellow triangle the defect is being dealt with and the notes provide more information and possibly a photo to refer to

You can now move on and continue with a new check and no need to repeat that defect as its being dealt with (unless worse)

Take Photo of Asset ID

We use ANPR to read number plates but also this allows the manager to verify the ID is correct

You can hen move on the answer all the questions (some maybe enforced so you may not be able to move on until you answer them – such as Mileage)

NOTE: the questions may not be the same as this guide depending on the clients requests but the formats and principles of use will be the same

SPECIAL NOTE FOR DRIVING LICENCE CHECKS: if your using the app to complete your driver licence check mandate please take a nice clear photo of your driver licence front and back and same with your CPC (DQC) Card as we read the data from the card to access the DVLA information

TIP: Top left shows the Asset ID that your checking in this case “CSVAN”

Top right Lightbulb hijacks the camera flash to use as a torch whilst checking the asset if required

TIP: Middle top you see a counter (if applicable) this counts the seconds you spend on this page it may actually be enforced so you cannot move on until you reached the (enforced) seconds particularly if you need to be more detailed in certain areas.

You will also see next to the middle counter a further counter (if applicable) – this is the overall timing of the check so you can see your progress – this also maybe fixed and you may not complete the check until the time has been reached

Straight forward touch pass or fail as you walk around the vehicle

As you see a defect touch the fail button and type in details of the defect and take a photo or photos – this is most helpful for the engineer to determine if roadworthy or not and to assist in the repair/rectification

Then carry on with the check each page will be a similar layout working your way through the template

Tip if you do not press anything and try and move on – you will not be able to

Additional Text/Images

At the end of the check you can as optional:

  • Add additional photos
  • Add Text

Then confirm vehicle is fit/unfit for use

Confirm you (user) is fit to drive/work

Press Submit

Summary of defects – At this stage your not committed, you can go back and re-enter if you have missed something or alter what you have entered

Finally Press Submit

Submission confirmed if there are any issues it will say on this screen:

  • If there is a Poor signal/no data it will say  “Check saved to device please sync later”
  • It also maybe the case that there is enough signal to send the data but not the photos in that case it will say ”Poor signal, photos saved to device please sync later”

Job Cards

If you have opted for Job Cards the following screens are applicable to you

Once you have pressed the Job Cards Tab on the main App menu you will be presented with a list of jobs – click one if them and you are presented with the screen as below showing you the details and a photo is applicable you can now

Start Job


Dealing with the Job Card

You can now enter the tasks undertaken to complete the job by adding notes and making the defect Serviceable or Clear Defect, you can lso at this stage take a photo (great idea to avoid any doubt of the task completed).

You can make the job complete and update – this auto updates the back office

You can now see on your device the completed job and the Manager can also see this on the back office.


Compliance completed !!!

Hints and Tips

Speak to the App (Voice to Text)

You may wish to speak to the app instead of typing in the “defect”

To do this, when you click “Fail” to report the defect you will see on you keyboard a picture of a microphone, press this and it will allow you to speak to the app.

App Speak to you (Text to Voice)

To access Text to Speech on your device, this it is a phone settings you need to do and here are the guides as to what to do
Have a look through the guide stuff its really easy to sort – we have done our bit so it reads the checks just need to do your bit now.
Any issues or help please email support@checkedsafe.com or call 01282908429

Need some help? Let us know what you need

Use one of the contact methods below and let us help

British pound icon offer - 'Just a quid per vehicle try for free'